
Note: You are viewing an old revision of this page. View the current version.
The electrolytic capacitors in old (and new) electronic equipment use a wet dielectric --- they dry out with age. This happen whether in use, or sitting on a shelf in a warehouse --- in fact, use may prolong their life, see ?CapacitorReforming). They have a shelf-life, usually stated to be on the order of ten to twenty years.
The wax-and-paper caps also "dry out" and have a similar lifetime.
As ToneWheel Hammonds (Leslies too) are in general, twenty-nine to sixty-eight years old, their caps are long since past their "pull date". Eventually, old caps will cause problems. Possible symptoms range from hum to tonal degradation to explosion and fire. Many feel that the capacitors should be replaced as a matter of course (PreventativeMaintenance.)
There's an excellent reference on capacitor replacement at  http://antiqueradio.org/recap.htm. But before you start poking around in your organ, please note that HammondsCanKillYou.
The wax-and-paper caps used in the filter networks on the ToneGenerator degrade like all the others. However, if you are considering replacing yours, be advised that whether and how to replace the ToneGenerator capacitors is a hotly debated subject.
Replacing aged capacitors in the vibrato delay line box is probably less controversial.
StefanVorkoetter has written a nice article on how to do this.
(His site also suggests some improvements to the vibrato in the M-100 series spinet models.)
Most often, many of the electrolytic capacitors needing replacement are of the multi-section can type. These caps usually plug into sockets, and protrude from the top of your (pre-)amp chassis --- each aluminum can actually contains several (two to four) separate capacitors. These capacitors are no longer manufactured (well, there are some manufactured in Mexico, but their quality is highly suspect), so generally one needs to replace them with individual capacitors.
(Another alternative is provided by ZackEngineering, who makes replacement multi-section capacitors from modern miniturized electrolytics.) (Yet another alternative is FrontierCapacitor, who, reportedly, will "rebuild" your multi-section can caps for you --- removing the old guts and replacing them with modern caps.)
(And yet another place which seems to be custom-building multi-section caps: askjanfirst.de.)
How then to mount the replacement capacitors? Here's what I do:
Here are some pictures of caps that have been replaced on a T-582c spinet organ. As you can see, the owner (myself) was lazy and did not bother with terminal strips. I just twisted + soldered the caps onto the wires. To make it easier, since oftentimes there were several wires to the positive lead, I simply used a pair of needlenose pliers and tore the metal terminal-piece they were soldered to off of the old cap, and soldered the lead onto that. I covered up the leads and connections with electrical tape to avoid shorts and other nasty things that can happen to the unwitting. I recommend you do a good solder job to save the trouble later. Remember, with the kind of power running through there, any resistance is just going to get hotter and hotter and eventually your connections will fail.. Whoops, there goes your organ.
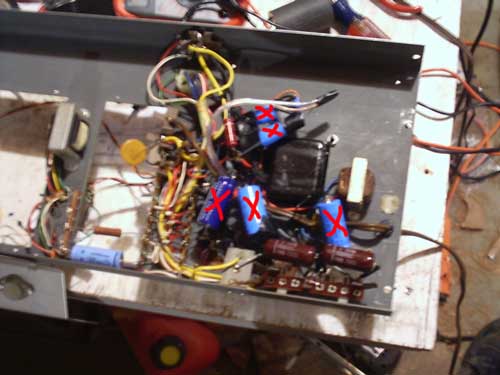
The replaced caps have circles over them. I only ripped out one of the old caps, then I realised it was better to just leave them in and I disconnected the others and put electrical tape over the terminals. The two caps next to each other are replacing a canister-cap with two values. I tied the grounds together (Yeah, 18 gauge speaker wire happened to be sitting on the workbench and I didn't feel like hunting for anything better.)
There, it's as good as new. Except for that rather ugly hole where I ripped one out, you could never tell the caps were replaced. Note that these capacitors are attached to their cardboard-esque bases and riveted into the chassis, so they're a pain to remove, should you ever want to. ~PeterCsere
Appropriate terminal strips are a bit tough to find, as they more-or-less are only used in tube equipment. In any case they come in various sizes (with varying numbers of terminals). Pick the ones that best fit the size and number of capacitors you have to mount (and fit in the space you have to mount them in.)
MouserElectronics stocks some terminal strips which will do the job (though they are not my favorite style). The Mouser part numbers are 158-1002 through 158-1008 --- they are listed on page 202 of the current catalog (#605) (p. 180 in catalog #604). Here's a link to Mouser's spec sheets for these terminal strips.
If you replace a can cap with under-the-hood discrete caps, it would be a good idea, either to remove the cap socket altogether (and plug the resulting hole), or to otherwise disable the cap socket (?ThomDay suggests potting with epoxy), to prevent the unsuspecting from plugging another cap (or their fingers).
Multi section can capacitors in correct values for the many Hammonds and Leslies, including the B3 and 122 style Leslies are available from http://www.tubesandmore.com Good quality made in USA on Malory's old equipment to the same specs. I have used them in several organs and leslies with good results
--Jon Peters
I've written an article detailing the replacement of the can capacitors (and the other electrolytics) in the AO-29 amplifier used in Hammond's M-100 series of spinet organs: Overhauling the AO-29 Amplifier in the Hammond M-100 Series.
See also CapacitorIdentification
The content of this page is Copyright (C) 2000, 2001, 2002 Geoffrey T. Dairiki and
the other authors of the content, whoever they may be.
This is free information and you are welcome redistribute it
under certain conditions; see
http://www.dairiki.org/HammondWiki/opl.html for details.
Absolutely no warrantee is made as to the correctness of
the information on this page.