
Note: I, personally, am a bit leery of method. (The output of the swell capacitor is a fairly high impedance node.) See LineOutFromASpinet for alternatives to this method. --JeffDairiki
Here is an easy way to add a line-level output to a Hammond M3 spinet organ Unplug the organ from the wall. From the back of the organ:
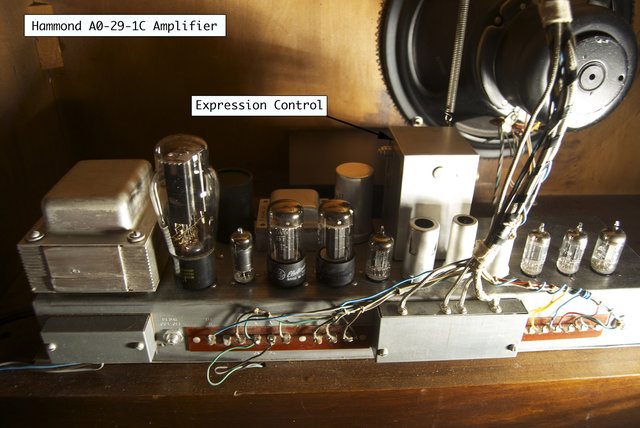
Locate the silver box on top of the AO-29 amplifier that houses the Expression control electronics. It is easily identified as an arm connects the expression pedal to the box, and there is an RCA jack located on one side of the box. This RCA jack is normally used as an INPUT to the amplifier so that you can play along with a record. We're going to turn this input to a dedicated output.
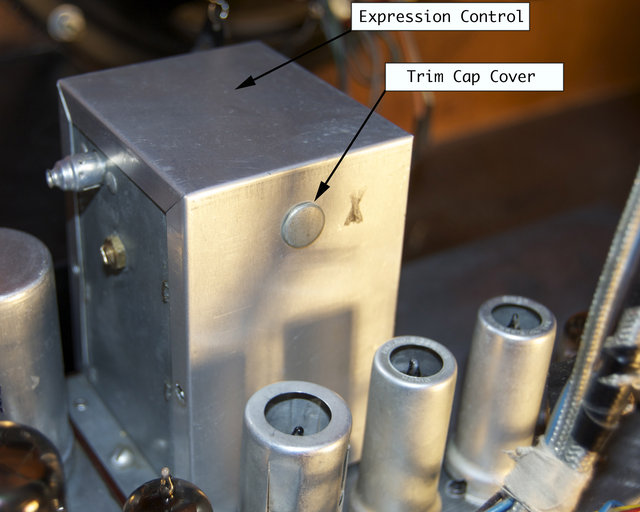
Remove the 4 flathead screws that hold the box cover on. These screws are in the sides of the expression pedal box, not on the bottom. Remove this cover.
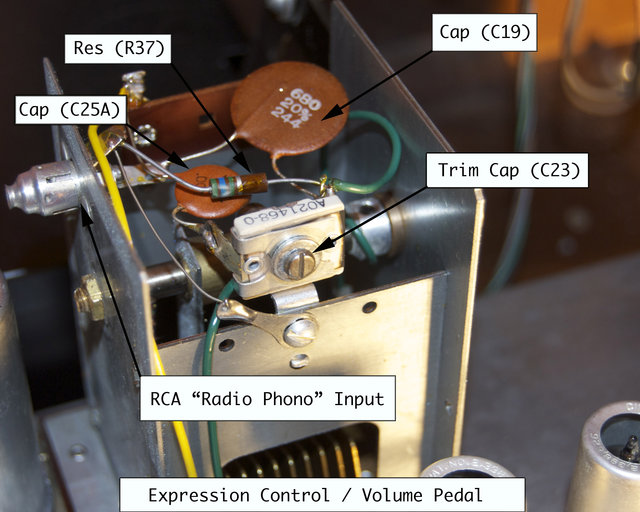
Look at the inside of the RCA connector. You will see a 680 pf disc capacitor from the HOT end (TIP) of the RCA plug that is normally used as an audio input. Cut the lead that connects this cap to the RCA plug. Carefully push this off to the side, and tape the lead so that it does not short out against the metal box or other internal components. This will allow you to revert back to a "stock" M3 should you later decide to.
Moving forward from the RCA plug towards the front of the organ, you will see a terminal with a yellow wire connected to it. This is the output of the expression peddal and has the organ's un-amplified signal. Soldered a 1uF cap from the yellow signal lead of the expression control to the HOT side of the RCA plug. This will remove any DC offset in the signal.
Test the organ by plugging an RCA cable into the expression pedal's RCA jack and plugging the other end into an amp or mixing console. Turn down the volume of the amp or mixer, and power up the organ. I recommend setting the volume rocker switch to SOFT.Bring up the mixer volume and see how it sounds. If you get a buzz or no output, recheck your connections. If it sounds good, use the expression pedal to adjust the output to the mixer. If all is well, re-install the metal expression pedal cover, taking care not to short out any exposed wires or leads.
I have tried this with a variety of pad resistors to regulate the output, but found that using the SOFT volume tab and the expression pedal all of the way down I had a clean signal that was hot enough for the board without adding any resistors. I immediately noticed more high end, thanks to the full-range monitor speakers versus the on-board speaker. I still have the main speaker hooked up to provide a load to the amp.
If you wish to disable the speaker output of the organ, see SpinetEMToPMConversion.
   I tried the above method for adding a line out to my M-3 and, for some unknown reason,
   every time I hooked up a patch cord from my Digitech RPM Leslie simulator, there was an extremely
   high-pitched, continuous squeal (even from the organ's internal speaker)!
   In the end I placed a .1uf non-polarized capacitor between the ground and the signal and the nasty
   noise went away.  I think it may have reduced the output level slightly, but it's still plenty
   to power my amplification, and I don't have to use the "soft" tab anymore. --BrianAndrewMarek

   I used this method on my '61 M3 and it worked great! I didn't need any caps to ground and my organ
   didn't lose any tone.  I would recommend this method over hooking up to the power amp output for
   the safety of whatever tone cabinet/amplifier/mixer you're trying to hook up. --BruceBarnes


   I tried this method and it just blew my mind. I had to add the .1uF cap because it was really noisy at first.
   It might be because my M3 is really really old, from 57 or something and it has that old electromagnetic speaker in it.
   But ounce I did the mod and hooked it up to my early 70's fender twin reverb, I just couldn't believe the sound!
   It's even fuller and warmer then the B4 Native Instrument Computer Program everybody raves about.
   I've tried them both at the same time in the same amp.  --Frederic Charest
I tried the above method of getting into the expression pedal wiring, removing the .00068 uf cap, installing the 1uf, etc...but the signal was way too hot for my liking. I put the wiring back to stock, and found the signal to be just right. As far as disabling the internal speaker, I just pulled the 6V6 power tubes (I have a 1957 M3). From what I have been told about tube amps, this is generally safe except for the *possibility* of heater voltage being elevated at the preamp tubes, thus shortening their lifespan. Otherwise, there shouldn't be any risk of damage to the rest of the amp. So far I haven't experienced any problems, and it sounds great through a SF Fender Vibrolux... --Amos McWoods
I went for a variation that involves getting at the guts of the amp: Use the Radio Phono plug, disconnect C19 / 680 pf as above. Run 1 mfd / 250VDC capacitor connection to V4B pin 6, which is the 12AX7 gain stage after the expression control. I placed the capacitor at the turret board connection for V4B pin 6, and ran wire up into the swell capacitor cover to the RCA jack. I found that this caused far less volume drop in the M-100's internal speakers than the direct C19 / 680 pf replacement variation, as it uses a somewhat lower impedance point. Greatest benefit I see is that it isolates the 'loud/soft' network in front of the expression pedal from any loading issues caused by the external connection. Gain is higher here so the 'soft volume' setting or padding resistors may be more likely required. My application involved feeding a Gulbransen APS-5 PP 6L6 amp from a B-2 organ, which is still feeding the Gulbransen internal 1-speed Leslie in a chopped organ cabinet. The APS-5 has a 500K input impedance which is the adjustable volume control, so I can adjust for clean or overdrive pretty easily. You would still want to use a direct box with a fairly high input impedance (1-2 meg best) for driving a low impedance mixing console or mic preamp, since this is still a high impedance output. --Doug Williams
Here is a pic of the box,rc plug,terminal,etc --Mike

Here's some more pics --Chris
12/21/2016
I did this today, super easy although my yellow wire was in front, I did not have the cap to gnd. I first cut the car and used clips to test the new cap, worked fine So I soldered it in. Then, on the RT of the lower manual, I replaced the wood panel with a scrap piece of wood the same size, drilled out a few holes and have a zoom mt100 pedals there. I use it for reverb, chorus, detune, flander, delay, echo, etc. I Have this now running into a zoom g3x used only as a preamp, into a carvin dCM 200l, then into a JBL e120. It is very sweet. I am getting a SMS classic preamp which I expect to make this sound even better. Now, I just need to replace my electro caps because the noise still comes through the line out, but then again with the SMS I may just take out the amp. So if anyone can help me find out have to Do This I'd appreciate it. Oh, my M3 is a 1960.
The content of this page is Copyright (C) 2000, 2001, 2002 Geoffrey T. Dairiki and
the other authors of the content, whoever they may be.
This is free information and you are welcome redistribute it
under certain conditions; see
http://www.dairiki.org/HammondWiki/opl.html for details.
Absolutely no warrantee is made as to the correctness of
the information on this page.